Thursday, October 31, 2013

Sugar Coat gets it's copyright on!

Oh, wouldn't it be nice if having an art business didn't include things like taxes, licenses, marketing and copyrighting? But alas, the artist must submit to such demands. The good news is, that copyrighting is not so bad after all. I just finished copyrighting my new Jewelry line Sugar Coat, because I am scared that Urban Outfitters is going to steal it from me. Ok, secretly I would be totally flattered, but I am sure those execs can afford to hire a dog walker everyday, so UO, let's talk...
It took me less than an hour to file, and half of that time was spent trying to remember my user name and password from the last time I filed, a few years back. Seriously, there was no way to retrieve my user name, so I gave up and started a new account. Learn from my laziness, write down your username/password info somewhere.

Here is the link to get started: http://www.copyright.gov/ 

Click on eCO log in, which will take you to this page, where you can register an account.

Sadly, there are no pink bulls eyes on the official site.


Click on Register a New Claim


From there there are a series of many steps, but each one is really simple. You will have to choose what kind of work you are registering, music, art, writing. I registered a whole jewelry line, I am pretty sure that something like that counts as just one submission. It costs $35 every time you do this on line, no matter how many things you register, so you can do lots of art at one time.
After completing the many easy steps you will have to make a payment. I used a credit card, easy peasy. Then once your payment has been accepted, you can upload the images of the work you are registering.


Sugar Coat sneek peek...

I used all low res jpegs, and used 4 images to represent my line, one image was my logo. 
I then received a bunch of emails saying that I had completed my registration, and the paper work will be mailed to me.
That's all there is to it. I know it seems daunting, but it was really easy, so go protect yourself and your awesome artwork!!

Monday, October 7, 2013

Sugarcoats Sweet Model

Beauty and brains, oh, what a winning combination. My jewelry line, Sugarcoat is almost ready to launch, and I have just finished shooting my pieces on my new model. After going through the pictures, which by the way, needed so little re-touching, I have grown to absolutely adore Alexis. Here is a sneak peek of Sugarcoat as worn by Alexis Laura Ren.


 ALexis is a UC Berkeley undergrad, deciding between biology and computer science. When she is not modeling or studying, she is working for a professor creating code. She is a self proclaimed "geeky girl", a brainiac who had to guide me through the process of using dropbox.


 I had know idea shooting a model would be so much fun. Alexis is sweet as can be, so easy to work with, eager to improve her modeling techniques, and most importantly, can put her hair in these adorable buns without the use of a mirror.


I couldn't have asked for a more perfect model to show off my Sugarcoat jewelry line. The only regret is that Alexis looks so much better in all my clothes and hats than I do!!!!!

 
My favorite shirt and hat...I'll never wear them again!!!!
Thank you Alexis for being so darn adorable. To see the Sugarcoat pieces up close, stay tuned for the Sugarcoat store coming soon to an internet near you.

Monday, September 23, 2013

Name That Shape

Artists, designers and crafters, please help me name that shape:


I am interested in any thoughts on what this shape, and shapes like it may be called, or what you would call it.
Thanks so much, I will post a name if we find one, or a possibility if I get some good ideas.

Wednesday, September 4, 2013

Elaine Miller Bond and The Animals


I, am clearly not a nature girl. I don’t hike, camp, ski, or even bike ride. I have an appreciation for Mother Nature, and believe that watermelons may prove the existence of a god, but I would rather be trapped in my studio than going scuba diving any day. I do however have a soft spot for animals, my four legged fluff balls especially. 

Bonnie and Bailey. Aka: Beasts of the Western Wild
                     
                       I recently had the good fortune to meet my new friend, Elaine Miller Bond. 
My beautiful new friend Elaine, and her beautiful new friend, Horsey.
Elaine is one of those people who is talented in so many ways. She is an accomplished writer and photographer. She is a photojournalist who has contributed articles to papers all over the San Francisco Bay Area.  Her passion and area of expertise:  nature and wildlife.
Love is sweet....

Elaine has recently published her second book, Dream Affimals: Affirmation +Animals, and I just finished reading it. Turns out Elaine is also a talented illustrator.  I must say her illustrations are fantastic. I know how challenging drawing fur is and getting animals to look gestural, not stiff, and she did an excellent job.

Amanda the panda, and her baby, Sadie.
  
 And the content, well, as a person who needs some daily positive thinking, this book delivers. Elaine uses animal habits and characteristics to draw positive affirmations that we can use in our daily lives. For example, the giant panda affirmation is “See beyond black and white” and the blue whale  affirmation is “Love big”, due to the whales ½ ton heart.

Yes, I am indeed the walrus...


I learned lots of cool animals facts such as butterflies can taste through their feet the flavors of the different leaves they land on, and how one coyote eats up to 5 rodents per day, which I must admit, makes me like coyotes, a lot.
You can learn more about Elaine and her books on her website: http://www.elainemillerbond.com/ and you can check out Dream Affimals at:  http://www.elainemillerbond.com/dreamaffimals.html
Part of what I love about Elaine is that she looks nothing like a nature girl, and I truly can not imagine her in hiking boots, but rather, in platform mary janes from Tokyo.
Pursuing the path of an artist can be challenging at times, ok, a lot of the time.  But like the wolverine, I will keep my fighting spirit!


Tuesday, August 20, 2013

Tube Rivet, 25 years in the making...

Yes, I have been making jewelry and metalsmithing for over 25 years, and only today did I set my first tube rivet.

The key to teaching shop classes is improvisation, and the following tutorial is an improvised tube rivet. I had a broken tube cutter, a drawer full of drill bits which were not the right size, and no dapping punch, yet behold, I made a tube rivet.

School starts next week, and my first assignment for my advanced class will be a set of bangles which will have to in some way incorporate a tube rivet. The sample I created is only a sample, it's pretty bare bones, but with some imagination this concept of cold connecting a bangle can become pretty exciting. Here goes:

Like wire rivets, the key to a tube rivet is a snug fit. Like I said, I could not find a drill bit to match my tube so I drilled my holes pretty close, a bit small, then used a round needle file to open up the hole. Go slow, you can easily file away too much, then your hole is too big.


I started with a 10 inch strip. I textured one end, then drilled my hole. I then opened the hole up a bit with my file.

I then cut my strip down to 9 inches. I then annealed, wrapped it around a bracelet mandrel, and textured the other end. Note, I rounded one end, left the other more squared. 


I marked with a sharpie where I wanted to put the second hole, and opened up the bracelet to drill that hole. Then I reshaped it and fed my tube thru from the inside. I had to file the holes a bit more to get it in. Then I marked with a sharpie where I was going to cut the tube. I basically guessed on this measurement, but as you can see, only a small amount is going to be sticking out on each end.

I cut my tube by just holding it in my hands over my bench pin and using a 3/0 blade. I then inserted the tiny tube back into the bracelet. Rather than using a punch I used a ball peen hammer. I started on the inside, my hammer just barely fit inside, but I did have enough space to lightly tap straight down into the tube. Then I slide the bracelet onto the mandrel and hit from the top. My hole got a bit smooshed, it's not a perfect circle. The tube walls flattened nicely around the hole though.

And a little liver of sulfur...


This is by no means a finished piece, it is merely a sample so that my 16 years olds have something they can hold and see up close. I fully expect them to run with this and make creative amazing bangles. The cool thing about metalsmithing and jewelry is the limitless possibilities. I will be sure to post the results of this assignment. Until then, I will be refining my tube riveting skills, but I must say, it really is so easy, and fun....
Happy riveting!!

P.S. This bracelet is a bit too big for me. I should have overlapped the ends further. Play around a bit to get the right fit. :)

Saturday, August 10, 2013

Woof, Meow, Moo...

As many of you know, I am in the process of starting a jewelry line. This means I have a to-do list very long which includes making business cards as well as figuring out how I want to package and ship the pieces. I knew I wanted stickers to use to seal envelops and boxes, as well as some just to include for fun in the package. I have seen and been impressed with the little, Mini Moo cards so decided to hit Moo up for some stickers. The amazing thing about Moo, is that you can use as many images as you want for each order. This is great for artists and designers, so you can feature and share lots of different art.

But first, I wanted to share with you how two fantastic jewelers use Mini Moo cards.  Last weekend I went to the American Crafts Council show, and picked up lots of Moo cards along the way that the artists had in their booths.

Silver and enamel by Beth Novak.  


Silver, copper and precious stones by Brandon Holschuh.

Being able to sift through the cards and pick out my favorites helped to ease the sting of not being able to purchase a piece...a little bit...
You can see more of this incredible jewelry at:
www.bethnovakenamels.com and www.brandonholschuh.com  

And, now, the stickers!! I placed my order for 2 sets of stickers and it was easy peasy.
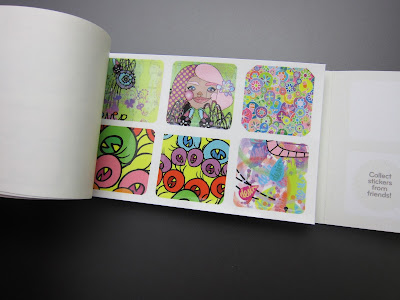
I purchased round 1 1/2" and square just under 1". Both sets came in lovely packaging, the square ones are in a book form with perforated pages.


The user interface (is that the right term? I can't believe I said that!!) on the Moo site is very simple. In around an hour I created around 40 different designs. I was basically testing out different types of images to see what looks good and what doesn't. I cropped from JPGS and AI files.  I also quickly took my logo in AI and formatted it to the right dimensions and played around with different variations.


52 round stickers for $12.99!


90 square stickers for $9.99!
 

The stickers are a durable vinyl material with a bit of a shine to them. Some of my images worked better than others. Some of my AI images seem not crisp and not saturated, while others are terrific. I may inquire into this next time I order...and there will be a next time...


What delightful packaging, there must be something wonderful inside...


I think Moo is an excellent resource for artists, crafters and designers. I am so happy they exist and once my jewelry line is closer to ready, I will make my Mini Moo cards as well as more stickers. Because, as we all know, a girl can't have too many stickers...


Thursday, August 1, 2013

Pass the Ether...Vintaj Patinas Review

As a jewelry/metal arts teacher, I feel it is my obligation to try as many new products I can find that I can incorporate into my curriculum. This is one of the best parts of my job in fact, for I get to shop and play.  I discovered Vintaj Patinas while looking at cool jewelry on Pinterest. (this is another obligation of my job, and clearly another perk) I saw silver pieces that were purple, nicely distressed looking and said, "hmmm, how did they do that?

I purchased my Vintaj Patinas from Rings & Things.  www.rings-things.com They describe them as "opaque, permanent, fast drying inks".  They come in packs of 3 colors. I purchased Victorian Gable, which includes Amethyst, Marine, and Quartz.


These patinas come in a squirt bottle, the process of applying them is neat and tidy. You can squirt then use a paint brush to spread it around. I started with clean copper and silver, textured metals so the patina could sit inside the recessed areas.

For the etched Hello, I used Quartz directly from the bottle tip. For the etched stars I squirted Marine on,  then used a paint brush. For the stamped stars, I used Amethyst and just used the bottle tip to push it around.


The directions say that for added longevity you can use a heat gun to set the inks. I did not do this because the bummer of this product is that it has a warning label saying it contains Ethelene Glycol Monobutyl Ether. Unless I am getting a face peel, I'm thinking its a good idea to stay away from chemicals like this, so the thought of releasing these fumes with a heat gun did not appeal to me. Instead I let them dry overnight.
Here is a wikipedia link about the side effects of exposure to Ethelene Glycol Monobutyl Ether:
http://en.wikipedia.org/wiki/2-Butoxyethanol

To finish up these samples I got a container of water, wet/dry sandpaper and a scotch bright. It did take some muscle to rub off the inks. I think the etched stars were not deep enough so the patina started to rub away from the recessed areas. The deeply etched Hello, with her smaller spaces worked excellently, as did the stamped stars.


Then I patina'd everything in Liver of Sulfur and the inks survived the soak, they stayed totally intact.


The Hello sample looks really great, it almost looks like inlay or enamel, its so smooth and perfect. The only bummer besides the ether is that this Quartz color is so light, it is closer to white then pink.
Overall, I am impressed with this product, I think it will really withstand time and wear.  I will be purchasing these for use with my high-school kids. My samples I suspect barely scratch the surface of what you can do with them. If you are curious here is a link with more info: http://vintaj.com/
Remember to sand off when wet so this toxic dust doesn't fly around!
Happy Patina-ing...

Wednesday, June 26, 2013

New Old Shoes

I sometimes have a difficult time letting go. Take for instance my 10 year old Dansko sandals. They are so comphy and still in pretty good shape, I just can't get rid of them despite the hideous color green the have always been, and I only recently have been able to accept this fact. Oh what's a girl to do...?

So, I have of course a mountain of markers and pens and I decided that these shoes really could not get any worse.  I chose colors that were dark because it has to cover this greenish color. I am using a Pantone purple and a Prisma turquoise.

This would have been a good time for a before picture. Oppps, but you can still see some of the green I have to contend with!!


The turquoise turned out fairly green and splotchy which I am not thrilled with. The purple is kind of magenta which is nice. I would say the Pantone did a superior job to the Prismacolor. I suspect that Copics would be excellent as well.


I pride myself at being good at many things, I would have to say, that shoe modeling is not one of them.


 I am very happy with my new shoes! I am going to go wear them now and see if I get any compliments. Happy inking!

Thursday, January 31, 2013

Little Paper Lanterns

It's been a week since my last loosey goosey lantern, and I am pleased to say that this weeks back to crafting has been much more successful and I am now back into the swing of things.  Turns out that my new collection of prayer papers from Hong Kong are very thin.  My mini lanterns needed much heavier papers, so only one of my new HK papers made it into this set of lanterns.  For this series, I decided that I was going to make all of them adhesive and tape free.  I used only little brads.  This posed a nice technical challenge, especially for making the lanterns actually hold a flameless tea light.
Here they are...


I made 7 little lanterns out of paper, mini brads and an 1/16 inch hole puncher.


Figuring out how to hold the tea lights was hard for some of the designs, this one was pretty easy.  Plus, all the tea lights need to be able to be dropped in from the top of the piece.


This was the toughest lantern to figure out, it's fairly fugly underneath, so I won't show you in case Martha Stewart is reading.


Although I intended these to be hanging lanterns, they would also work really well as table top lanterns, maybe at a fancy dinner or a party.


I am definitely enjoying making hanging paper objects and I think for my year of getting back to craft I will continue making paper ornaments, lanterns, garlands and banners.
I think for all my upcoming crafting projects I am going to make a goal of not buying anymore stuff!!  It feels so good to use all the supplies I have.  In fact, imagine if you will, a year of crafting and buying NOTHING!!!  A radical thought indeed.  Has anyone done this, if so, let me know!!
xo Lolo

Wednesday, January 16, 2013

The Letting Go, or, Make This Project Better Than I Did.

As a teacher, I can't tell you how many times I have encouraged my students to just let go, to play with their materials, to not focus on perfection and the end product, to just go for it and see what happens.  Well, this is certainly easier for some than others....

After my last post about my Chinese prayer papers, I decided that this was the year I drag myself away from Adobe Illustrator long enough to get back to crafting.  I decided to use my new papers to investigate and explore lantern forms and to cover my house in adorable little paper lantern garlands.

I have indeed made paper lanterns before, and this time I was going to step it up a notch, make beautifully crafted forms that would compel Martha Stewart to hire me as a freelance crafter.  I was going to make refined, sophisticated yet playful objects that would be splashed all over Pinterest.

For my getting back to crafting lantern I decided to take a different course than the one I would expect myself to take, and the one that would make you ohhhh and ahhhhh.  Instead, I abandoned all I hold dear as a crafter and I just went for it, with no plan, no thought of where I was going, working totally in the moment, with no thought as to what the next step would be.  That actually sounds like I was art making, and indeed there are tons of artists who work this way, with carefree abandon, and I always admire them...but I am not one of them.

About an hour into my letting go lantern, which I thought would be a round a 2 hour project, I realized that I hated the product I was making, and to be honest, that did put a damper on the process.  But, I forced myself to see it through to the end and 6 hours later I was putting on the finishing glitter glue touches.

I documented most of the process.  This piece looks like an explosion in the craft aisle, but I think it could be a potentially great project.  There are tons of variations, and if I was not so over it I would have added dangling dodads of sorts from the bottom.  You can do that...


I started by connecting 4 scrappy pencil drawings, then began collaging on top of them.  Next time, I would start with 1 long piece of paper rather than 4 separate pieces, and I would use a heavier paper than cheap-o sketchbook paper.


Part of my not planning or designing meant a lot of ugly stuff.  I removed a huge chunk, covered up things with paint, and now I am moderately satisfied with images.  The yellow lotus came from my Hong Kong papers.


For the bottom I cut a heavy piece of card board, then glued paper onto both sides.  I used this awesome tool to punch holes in it.  I actually don't know what its called and its not labeled, but I got it at Michaels, and I highly recommend checking it out.  I punched the holes hoping that light will shine through them, and also I can use the holes to hang dodads from.


For the top, I only covered 1 plane, and I punched a hole in the center.  Before I glue the box shut, I will make sure to have inserted this cord with a bead, so I have a way to hang the lantern.


The top view of the top.


Gluing up.  After closing the end walls, I inserted the cardboard bottom, and glued from the inside.  Then I glued in the top, but I glued from the top since it was all sealed up by then.  This was the worst part of the process.  My walls were all irregular and distorted from using paper too thin, so it was very messy and hard to glue.

And there you have it!  The door will give me access to inserting a flameless tea candle, and it should let the light shine through.

It needs a handle, I think for the next one I will do that.   That cool punching tool will also set grommets which is what I would do for adding a handle.

So there you have it, me at my loosey goosey-est.   It's lumpy and bumpy, there are glue stains, and there are gaps in the corners.  I am hoping to bring some of this letting go to all my work this year, my surface designs as well as my crafty projects.  Making this piece reminded me of being a kid, and just making stuff for the love of doing it, with no agenda for where it was going to end up, or who was going to see it.  I would say "ahhh, the good old days"  but actually, these are the good old days...

Tuesday, January 8, 2013

Happy Almost Chinese New Year!

Well, it's not quite Chinese New Year yet, but I have just returned from an amazing trip to Hong Kong, where I visited my inspiring and beautiful sister Karen, her sweet as can be husband Dean, and my lovely niece Sacha.  Hong Kong was wonderful.  We ate, we walked, we visited Buddhas, and of course, we shopped.  OK, I shopped, and as I unpacked my bags, including the new adorable pink butterfly one I desperately needed to transport my new goods home,  I realize that I was a wild woman!

As a passionate surface designer, artist and crafty gal, I feel compelled to purchase paper goods from every place I visit and Hong Kong proved extremely fruitful.  I consider it research, really...

The bulk of the paper goods I got came from a prayer shop.  These amazing shops contain paper goods with traditional Chinese imagery such as lotus's, chrysanthemums, dragons and Chinese characters.  All the paper goods from the prayer stores are intended to be burned in temples during holidays, funerals, and during everyday praying.  It's hard to believe these papers will be burned, they are so beautiful.

Lots of the papers actually represent everyday objects such as clothing, cell phones and houses.  The houses were like paper doll houses, they were amazing but I didn't see any packed flat, and my luggage was already busting at the seams so I will have to wait until my next visit to get one.
Most of the papers I got were packaged in mysterious bundles.  I will unwrap them now, here goes...


A stack of lotus flowers with lots of gold leaf-ish accents.


Beautiful mini traditional outfits.


Yipee, with enough outfits to cut up and still have some left over!


I unfolded this and it's actually a huge bag.  Isn't it amazing!!! Wish I got 2!


These are life size shirts and include pants as well.  I love the variety of flowers on the blue one, and how they are clustered together.  Must remember this for my own flower designs!


An Indian paisley in purples, yum!!


A mysterious bundle, I wonder what's inside?


Woo hoo!!


Another bundle, bigger, fantastic exterior paper, can't wait to see what's inside...


But of course, a complete life size outfit.  Hmmm, I don't think those shoes will fit me...


One final bundle, nice and chunky, will if be the best bundle of all...?


Holy bundle indeed! 


I am delighted by my Chinese papers, they are so beautiful and are going to be inspirational for my own surface designs and patterns.

I have decided that 2013 is the year I go back to serious crafting.  I will balance my time between surface designing on the computer, and crafting in the studio.  My first project will be to make little lanterns and hanging ornaments with these papers and the rest of my pretty huge paper collection. 

Until then, jet lag is forcing my eyes shut...Happy Year of the Snake!!