Tuesday, August 20, 2013

Tube Rivet, 25 years in the making...

Yes, I have been making jewelry and metalsmithing for over 25 years, and only today did I set my first tube rivet.

The key to teaching shop classes is improvisation, and the following tutorial is an improvised tube rivet. I had a broken tube cutter, a drawer full of drill bits which were not the right size, and no dapping punch, yet behold, I made a tube rivet.

School starts next week, and my first assignment for my advanced class will be a set of bangles which will have to in some way incorporate a tube rivet. The sample I created is only a sample, it's pretty bare bones, but with some imagination this concept of cold connecting a bangle can become pretty exciting. Here goes:

Like wire rivets, the key to a tube rivet is a snug fit. Like I said, I could not find a drill bit to match my tube so I drilled my holes pretty close, a bit small, then used a round needle file to open up the hole. Go slow, you can easily file away too much, then your hole is too big.


I started with a 10 inch strip. I textured one end, then drilled my hole. I then opened the hole up a bit with my file.

I then cut my strip down to 9 inches. I then annealed, wrapped it around a bracelet mandrel, and textured the other end. Note, I rounded one end, left the other more squared. 


I marked with a sharpie where I wanted to put the second hole, and opened up the bracelet to drill that hole. Then I reshaped it and fed my tube thru from the inside. I had to file the holes a bit more to get it in. Then I marked with a sharpie where I was going to cut the tube. I basically guessed on this measurement, but as you can see, only a small amount is going to be sticking out on each end.

I cut my tube by just holding it in my hands over my bench pin and using a 3/0 blade. I then inserted the tiny tube back into the bracelet. Rather than using a punch I used a ball peen hammer. I started on the inside, my hammer just barely fit inside, but I did have enough space to lightly tap straight down into the tube. Then I slide the bracelet onto the mandrel and hit from the top. My hole got a bit smooshed, it's not a perfect circle. The tube walls flattened nicely around the hole though.

And a little liver of sulfur...


This is by no means a finished piece, it is merely a sample so that my 16 years olds have something they can hold and see up close. I fully expect them to run with this and make creative amazing bangles. The cool thing about metalsmithing and jewelry is the limitless possibilities. I will be sure to post the results of this assignment. Until then, I will be refining my tube riveting skills, but I must say, it really is so easy, and fun....
Happy riveting!!

P.S. This bracelet is a bit too big for me. I should have overlapped the ends further. Play around a bit to get the right fit. :)

Saturday, August 10, 2013

Woof, Meow, Moo...

As many of you know, I am in the process of starting a jewelry line. This means I have a to-do list very long which includes making business cards as well as figuring out how I want to package and ship the pieces. I knew I wanted stickers to use to seal envelops and boxes, as well as some just to include for fun in the package. I have seen and been impressed with the little, Mini Moo cards so decided to hit Moo up for some stickers. The amazing thing about Moo, is that you can use as many images as you want for each order. This is great for artists and designers, so you can feature and share lots of different art.

But first, I wanted to share with you how two fantastic jewelers use Mini Moo cards.  Last weekend I went to the American Crafts Council show, and picked up lots of Moo cards along the way that the artists had in their booths.

Silver and enamel by Beth Novak.  


Silver, copper and precious stones by Brandon Holschuh.

Being able to sift through the cards and pick out my favorites helped to ease the sting of not being able to purchase a piece...a little bit...
You can see more of this incredible jewelry at:
www.bethnovakenamels.com and www.brandonholschuh.com  

And, now, the stickers!! I placed my order for 2 sets of stickers and it was easy peasy.
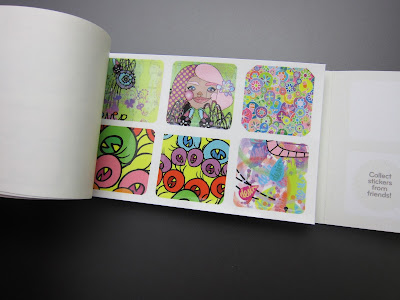
I purchased round 1 1/2" and square just under 1". Both sets came in lovely packaging, the square ones are in a book form with perforated pages.


The user interface (is that the right term? I can't believe I said that!!) on the Moo site is very simple. In around an hour I created around 40 different designs. I was basically testing out different types of images to see what looks good and what doesn't. I cropped from JPGS and AI files.  I also quickly took my logo in AI and formatted it to the right dimensions and played around with different variations.


52 round stickers for $12.99!


90 square stickers for $9.99!
 

The stickers are a durable vinyl material with a bit of a shine to them. Some of my images worked better than others. Some of my AI images seem not crisp and not saturated, while others are terrific. I may inquire into this next time I order...and there will be a next time...


What delightful packaging, there must be something wonderful inside...


I think Moo is an excellent resource for artists, crafters and designers. I am so happy they exist and once my jewelry line is closer to ready, I will make my Mini Moo cards as well as more stickers. Because, as we all know, a girl can't have too many stickers...


Thursday, August 1, 2013

Pass the Ether...Vintaj Patinas Review

As a jewelry/metal arts teacher, I feel it is my obligation to try as many new products I can find that I can incorporate into my curriculum. This is one of the best parts of my job in fact, for I get to shop and play.  I discovered Vintaj Patinas while looking at cool jewelry on Pinterest. (this is another obligation of my job, and clearly another perk) I saw silver pieces that were purple, nicely distressed looking and said, "hmmm, how did they do that?

I purchased my Vintaj Patinas from Rings & Things.  www.rings-things.com They describe them as "opaque, permanent, fast drying inks".  They come in packs of 3 colors. I purchased Victorian Gable, which includes Amethyst, Marine, and Quartz.


These patinas come in a squirt bottle, the process of applying them is neat and tidy. You can squirt then use a paint brush to spread it around. I started with clean copper and silver, textured metals so the patina could sit inside the recessed areas.

For the etched Hello, I used Quartz directly from the bottle tip. For the etched stars I squirted Marine on,  then used a paint brush. For the stamped stars, I used Amethyst and just used the bottle tip to push it around.


The directions say that for added longevity you can use a heat gun to set the inks. I did not do this because the bummer of this product is that it has a warning label saying it contains Ethelene Glycol Monobutyl Ether. Unless I am getting a face peel, I'm thinking its a good idea to stay away from chemicals like this, so the thought of releasing these fumes with a heat gun did not appeal to me. Instead I let them dry overnight.
Here is a wikipedia link about the side effects of exposure to Ethelene Glycol Monobutyl Ether:
http://en.wikipedia.org/wiki/2-Butoxyethanol

To finish up these samples I got a container of water, wet/dry sandpaper and a scotch bright. It did take some muscle to rub off the inks. I think the etched stars were not deep enough so the patina started to rub away from the recessed areas. The deeply etched Hello, with her smaller spaces worked excellently, as did the stamped stars.


Then I patina'd everything in Liver of Sulfur and the inks survived the soak, they stayed totally intact.


The Hello sample looks really great, it almost looks like inlay or enamel, its so smooth and perfect. The only bummer besides the ether is that this Quartz color is so light, it is closer to white then pink.
Overall, I am impressed with this product, I think it will really withstand time and wear.  I will be purchasing these for use with my high-school kids. My samples I suspect barely scratch the surface of what you can do with them. If you are curious here is a link with more info: http://vintaj.com/
Remember to sand off when wet so this toxic dust doesn't fly around!
Happy Patina-ing...