Friday, December 30, 2011

Whistle While You Work

What I listened to in 2011...

Around ten tears ago I had the realization that perhaps I became an artist because of the time it gave me to listen to lots of music.  It's probably a bit more complicated than that, but it really is perhaps the greatest perk of the job.  I get to listen to music sometimes all day long, and until the wee hours of the night.  So this post is a list of the 10 current albums I listened to the most in 2011.  Most of these were not actually released in 2011, but rather 2010, and I would like to add, I am so not a music critic so bare with me with regards to my simplistic descriptions.   "This album rocks!" will have to suffice at times...


Joanna Newsom, Have One On Me, 2010

Ok, I am about to really geek out here.  The most significant and life altering music for me of the past 10 years has been Joanna Newsom and 2010's Have One On Me will undoubtedly be playing on my Ipod for the next 10 years.  I can admit, it is not Y's, but with 18 songs, there are around 7 that are as amazing as any of the Y's songs.  I search far and wide for a musician or band that can put me in such a profound state of tizzy and awe as Joanna Newsom.  The search continues.


i said to you, Honey just open your heart, when I've got trouble even opening a honey jar...

So the bar is pretty high, and the following albums are pretty darn amazing too.  In no particular order:


Janelle Monae, The ArchAndroid, 2010
This album can not be categorized, and that is what is so incredible about it.  Hip-hop, funk, soul, rock, folk, and 1940's movie soundtracks.  She even has songs where she sounds like David Bowie circa mid 70's and Prince mid 90's.  Your earballs won't believe it!

PJ Harvey, Let England Shake, 2011
Does Polly Jean ever do anything not amazing?  I actually like this album more than some of her other recent releases.  This is very political, less crunchy guitars, more weird vocals.  Love it.  Dry is still my favorite though!


War Paint, Exquisite Corpse, 2010


I don't know much about War Paint, other than they are from LA and they are geniuses...


 Jenny Hval, visera, 2011
This album I recently found at Amoeba and it has blown me away.  Super strange and artsy-fartsy.  She writes a lot about her clitoris and the hum of battery operated devices.


Rasputina, Sisterkinderhook, 2010
This is my favorite Rasputina album so far!  It's incredibly weird, Melora's vocals are getting more creepy and wobbly.  It's the most fairytale-ish recording they have done.


Meklit Hadero, on a day like this, 2010
 Meklit is a Bay Area gal, I think she lives in San Francisco.  This album is gorgeous and soulful and eclectic.  It's pretty mellow, good for drawing late at night.


Laura Marling, A Creature I Don't Know, 2011

When it comes to pure, clean, sophisticated and unpretentious folk music, Laura Marling is queen. This is her 3rd album, and perhaps her best.  This album has hints of Joni's Court and Spark.  Laura's voice is so beautiful and smooth and it takes a few plays to realize how powerful and uncommon it is.  I have been playing this every night since I got it.

and, she is like 17!  Well, I think now she is the ripe old age of 21...
Wild Flag, 2011
I was a little bit nervous about this new band, they are Carrie and Janet from Sleater-Kinney, Mary Timony from Helium, and Rebecca Cole who has been in a bunch of Portland bands. As a S-K freak, I feared I would be let down by this new band, especially with the absence of Corin Tucker, but I have been really excited with this album.  It really is S-K meets Helium, but with a dash of psychedelia  and some huge arena rock moments.

 I went to their show in S.F and it was so fun!  Carrie rocks out like Jim Morrison or Robert Plant, thrashing about and screaming and rolling on the stage.  They are my role models!


Pree, Folly, 2011

Ok, I have consciously put this album last because it just may turn out to be my favorite album of the year and may come close to blissing me out the way Joanna does.  I only got this album a few days ago, but I am totally in love.  It's weird folk/rock, with a Coco Rosie-esque sounding vocalist.  Super wobbly, nasal-ly and stylizedl.  My very favorite sounds...


Well, there you have my 10 favorite albums that I listened to in 2011.  It was a good year, I got a lot of work done, was very inspired and I have the ladies above to thank for that...

May your new year ROCK!!!

Wednesday, December 21, 2011

Not a Red and Green Color Scheme

Ho ho ho?
I do have a tad of Xmas spirit, I'm not all Grinch, but let me state for the record, December is the only time a red/green color scheme should ever be permitted. So, this past week I used shades of yellows, blues, and of course pinks as my sketchbook color scheme...


Of note: If you plan on doing any holiday air travel,  make sure to bring your Copics with you on the plane.  Sharpies and Prismas are way to stinky, and the mean lady next to you will make you will make you feel bad.

Merry and happy...!


Monday, December 12, 2011

Pink, Purple, Yellow, Orange and Sometimes Black

I am sure by now it's abundantly clear that I am a hoarder of all this related to art and craft supplies.  My studio is busting at the seams with crafty materials of all kinds.  For example, how many markers does one gal really need? 


And this is just the pinks, purples, yellows and oranges!  So, after so many months of working on my Etsy store and on my home jewelry studio blog posts, I have decided to get back to basics.  Last week I cracked open a brand new sketch book and it feels good!  I have limited my palette to p,p,y,o and sometimes black.  I adore this extra girlie color scheme and think I will finish out the week in it.  Here's the pages I have done so far, in order of how I drew them...


Ok, I cheated here by adding green collaged bits...my bad.


It's been a fun week, I have been getting buzzed off of the pen fumes, which worries me some, I hate to damage anymore of my precious brain cells, but alas, we must sacrifice for our art....
Next week I change color schemes, but don't worry, it's bound to still include pink...

Thursday, December 1, 2011

Home Jewelry Studio Part 6

This is the final segment on how to create your own home jewelry studio.  If you're new to this blog then you may want to go back and check out parts 1-5...

Today I am going to talk about 2 other nifty tools that will greatly increase your jewelry making abilities, and work great at home in a smaller space, and don't require any torches or soldering; a dapping block, and a disk cutter.

NOTE:  The premise behind these posts is to help folks create a safe, affordable studio and to teach skills that one could learn without a class.  I have not included soldering or using a torch.  I believe that you can do tons of amazing stuff without a torch, but there are of course some limitations.  Metal is obviously hard and doesn't bend or form easily.  In addition to soldering, a torch is great for something called annealing.  Annealing is a process of heating up your metals, (wire and sheet) to make them more malleable, less brittle, more formable.  If you have worked in wire before, you may have noticed that it feels like it's getting harder as you work with it.  It is getting harder, that's called work hardening.  Annealing will soften up your work hardened metals.

If you don't have a torch however, the best metal to work in is copper, it is the most malleable.  Then silver and brass.  Nickel is very hard and won't be much fun.  If you are just cutting and texturing is it fine, but if you want to move the metal, I would avoid nickel.


The disk cutter:  we call it Pepe

Everybody loves Pepe the disk cutter.  Infact I don't even tell my beginning students about Pepe because I want them to learn to saw rather than relying on him.  Also, it can get pretty boring seeing a bunch of circle designs all day long.  However, Pepe can come in handy and will be a great addition to your home studio.

Disk cutters come in a variety of sizes.  The Rio catalog has 3, and now that I am looking at them, they are actually pretty pricy.  The most expensive is $525!!!  The one I would get is $265, but I bet if you search around, you can even find them cheaper.

So Pepe will cut up to 11 different circles that can then be used in a variety of ways.  With these cutters, you want to use softer metals, mainly copper and silver.  You can cut nickel and brass, but it dulls the cutting edges on the punches.  I would recommend using a 20 gauge sheet or thinner when using a disk cutter.

When using a disk cutter it is best to use a brasshead mallet.  (Brass is also best when stamping)

There are tons of possibilites with using circles, and all  the stuff I have discussed in the previous posts can be applied to circles: cutting out shapes from the inside, texturing, patina, drilling or punching holes...
One of the coolest things you can do with a disk is to put it into a dapping block and begin to form it into a dome.

Steel dapping block, wood dapping block, punches and hammers.

A dapping block is a piece of steel or wood with different sized round cavities.  Punches are big steel rods with a ball on the end that we use to form the metal in the cavity.  To start, take one of your circles and place it in a big cavity, then as it forms to the cavity, move it to progressively smaller cavities.  Since your metal is un-annealed, you don't want to force it into a small cavity, it will get stuck.  With un-annealed metal, it is pretty hard to get a perfect deep dome.  You can still do lots with shallower domes however.   In general, it's a good idea to try to transform your flat metal into 3D whenever you can.

Use a steel hammer or a plastic mallet to hit the punch that is hitting the disk.

Textured copper, brass and nickel  dapped disks.

For more info and ideas on stamping and texturing and working without a torch, I highly recommend the website http://www.beaducation.com/
Beadeducation will give you tons of info and ideas, and sells really cool stuff to stock your studio.

Finally, the coolest and most useful tool I have and no one should live without...A BRASS BRUSH

This is a brass brush.  It has soap on it...

 Whether you are making jewelry or are wearing tons of it, a brass brush is an essential object.  With all the processes I have discussed (EXCEPT HIGH POLISH!) the brass brush is the final step.  Use your dishwashing soap and some water and clean your final pieces with the brass brush for a beautiful luster-y finish.

Brass brush, dishsoap and H2O.
And, when all of your jewelry gets tarnished and dull looking, grab your brass brush and it will be beautiful in moments.  You can get one at Rio (tools and equipment, page 375) and you will wonder how you ever lived without it...

If you have any questions about anything, please let me know.  If you have any ideas you want to add about creating a home jewelry studio, we'd love to hear from you!

Student work: holes punched out with Pepe.

Student work:  Petals formed using a dapping block.

Tuesday, November 15, 2011

Home Jewelry Studio part 5

Hi all!  OK, here is a quick recap of the basics from the last 4 posts:

-We typically use copper, brass, nickel and sterling silver.
-Metal sheet and wire thickness is measured in gauges.  The lower the number, the thicker the metal. 18 gauge is a pretty standard sheet gauge for jewelry.
-With your jewelers saw you can cut any shapes you want too out of sheet metal.
-If you want to cut a shape from the inside of your piece of metal, it's called 'piercing' and you do it by drilling or punching a small hole, then feeding your saw blade through the hole.
-After cutting your shapes, you file all the edges using a variety of files.  Pick the right file for your line.  Some shapes will use many different files.
- For every shape we cut and file, we also need to deal with the surface of the shape as well.
-Surface treatments include texturing, sanding, patina, and polishing.
-Texturing and patina were discussed in part 4.

If you are new to this blog, you may want to go back to the first and second posts in this series which has the shopping list and more info on all of the above.


More Surface Treatments

Perhaps a funky textured and patinated surface is not your thing, then what?  Well, creating a smooth, pristine surface is really pretty easy to do at home and it can be done on the cheap.

We jewelers use wet/dry sandpaper to clean up our surfaces and to get out scratches.  You can get wet/dry sandpaper from a hardware store.  It's dark grey, it's not the yellow/brownish wood sandpaper.  Wet/dry typically comes in 120 grit to 600 grit.  The lower the number, the rougher the paper.  I typically buy 4 grits: 220, 320,400 and 600.  You usually don't need anything rougher than 220.


 To clean up your shape and make it really smooth start with 220 and sand back and forth in one direction.  Use some muscle to really get out the deep scratches.  Try to keep the grain linear in one direction.  You will now have a texture from the 220.  Take your 320, do the same thing to remove the 220 texture.  Use the 400 to remove the 320 texture, and then the 600 to remove the 400 texture.  At this point the piece  should be pretty smooth and the texture left over from the 600 is very fine.

Student work: Copper sanded to 600.  Liver of Sulfur Patina

Student work:  Nickel silver sanded to 600.

Important!!  Wet dry sandpaper is called wet/dry because you can work with it wet.  The benefits to working wet is that is doesn't kick up as much dust as it will dry.  Much better on your lungs if you plan on doing a lot of sanding.   Also, the paper is slightly more malleable when it's wet, so you can more easily fold it into little pointy shapes to get into smaller areas.  To work with it wet, just have a little bowl of water on your bench you can dip your paper into every now and again.


If you want an even more polished surface you can order a finer grit sandpaper from Rio (page 378).  Or, you can buy a polishing machine...

This is not on my initial list of jewelry making essentials, but polishing machines are a relatively inexpensive way to get very professional looking results at home.  My high school students tend to love shiny and they all "ooh" and "ah"  when I demo how to use it.   The important thing about high polishing is that you must go through all the sandpaper stages (220-600) before polishing.  If you don't it will look pretty bad, and the imperfections on your surface will stand out even more.


NOTE:  NEVER PUT A CHAIN ON A POLISHING MACHINE!

Seriously, you can really hurt your self, as in, like, loosing a finger!
The polishing machine has 2 spindles, one on the left, one on the right.   You can attach a variety of brushes and wheels to the spindles depending on what you are wanting to do.  For high polishing we use a 2 fabric wheels.  Each wheel uses a different polishing compound that we apply to the wheel while its rotating.


There are many different compounds and if you get a machine you should do some research on them, or you can buy the compounds called "Tripoli" and "Rouge".  Tripoli goes on the left wheel and it is the first one to use.  It is a rougher compound and it is taking out any residual marks from the 600 sandpaper.  After using the tripoli, move onto the other wheel and use the rouge compound.   The rouge is what gives it a super shiny, mirror like surface.

NEVER MIX COMPOUNDS ON THE SAME WHEEL!

If you want to buy a polishing machine, send me a message and I can give you more info on how to use them.  It's pretty darn easy, and you get immediate results.

Student work:  Sterling silver sanded to 600 and then high polished on the machine.

Student work: Nickel silver sanded to 600 and then high polished.

When you begin setting up your home studio it's a good idea to experiment combining all the surface techniques.  For example, high polish a textured surface.  It's kinda a jewelry no no, but heck, that's what may make it pretty cool.

At this point we have covered the main tools, techniques and purchases for starting your home studio.  Next week I will go over some other cool tools that you can add to your studio bit by bit that will open up your jewelry making possibilities even more...

Until then, let me know if  you have any questions.  Ta ta...

Teacher work: Silver, textured and sanded with a Liver of Sulfur patina.  :)

Tuesday, November 1, 2011

Home Jewelry Studio part 4

Last week we discussed how important filing your shapes is, and today we are going to cover some important info about the surface of your shapes.  Just like filing the edges of your shapes, we MUST deal with the surface as well. 


There are many different ways to deal with the surface of your metal.  Some folks love a slick, shiny high polished look, which IS achievable at home.  Some folks love a funky textural surface.  Some love a antiqued, patinated surface.  All of this can be done at home.  Lets start with texture...

Tools needed for texturing:
steel bench block
heavy steel hammer (like the normal kind you have around the house)
steel stamps (letters and designs)
chasing hammer
any other texturing hammers or hammers with different shaped heads
patina called Liver of Sulphur
Copper sheet 20 gauge
steel tweezers or rubber tipped tweezers
steel wool

Creating textures in metal is easy and really fun.  I would recommend using copper in 20 gauge, but any gauge is fine to use.  We have a variety of cool design stamps that include identifiable imagery such as stars, leafs, cherry's, hearts and flowers.  There are also tons of decorative stamps with more abstract non representational shapes and symbols.  Rio has lots, but I actually find more stamps at Otto Frei.  They have a website and catalog, and a killer stamp inventory.
http://www.ottofrei.com/

In addition to cool decorative stamps, there are also letter and number stamps.  In the Rio catalog there are a variety of different stamp sizes and fonts (page 134).  Most jewelry stamps are pretty small usually around a 1/4 inch.  For letters and numbers you can get bigger stamps from more industrial suppliers like Enco.  I have 1/2 inch letter stamps, I can't remember exactly where I bought them, but you can google search under 'steel letter stamps'.

Stamps in different sizes and designs.


In order to get a deep impression with the stamps, we need to always stamp with our metal on a steel bench block. (Rio page 111) With stamping it is best to hit the stamp once with a strong blow, but that may be difficult at first so if you can't get one strong blow, hit multiple times but be really careful that your stamp doesn't slip or move.  You can use your everyday hammer for this.

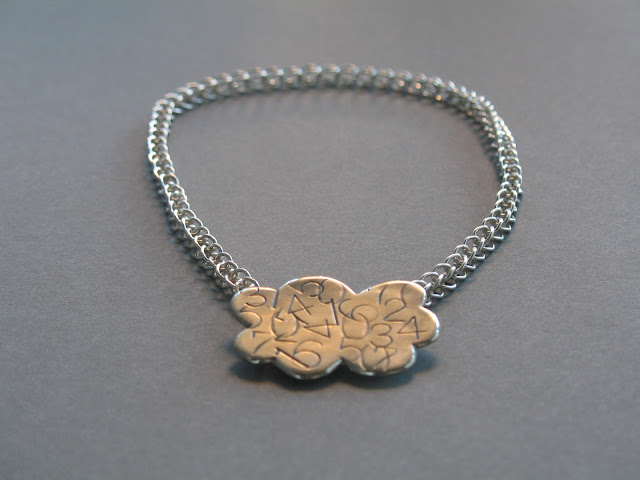
Student work.  Notice how she used numbers as a textural design element.


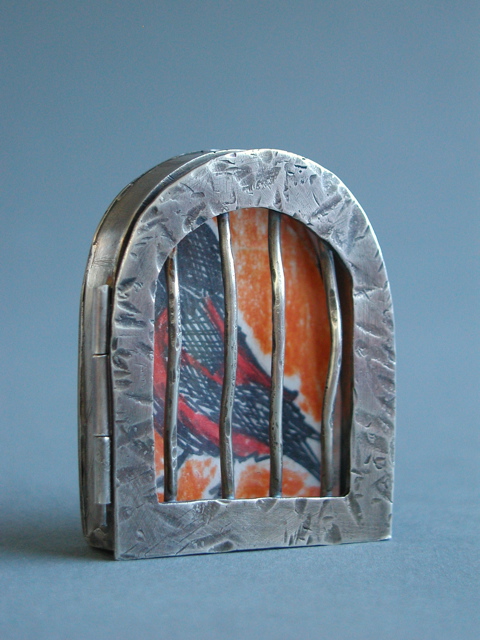
Student work.  Notice the hammered texture in the door and bars.

With your planishing hammer or other texturing hammers, experiment and see what kinds of marks they make.  Try filling in a 3 by 3 piece of copper with a variety of marks.  The small round side of the planishing hammer is especially nice and will give you a really cool texture reminiscent of the look of Mexican silver jewelry.  For those of you who already use wire in your jewelry, you can definitely texture your wire, in fact I highly recommend you do, it will give your pieces a much more sculptural feel.

Creating a variety of textures on copper using stamps and hammers.


Note: never use your planishing hammer or texturing hammers to hit your steel stamps.  Never hit these hammers onto steel, only onto your jewelry metals!

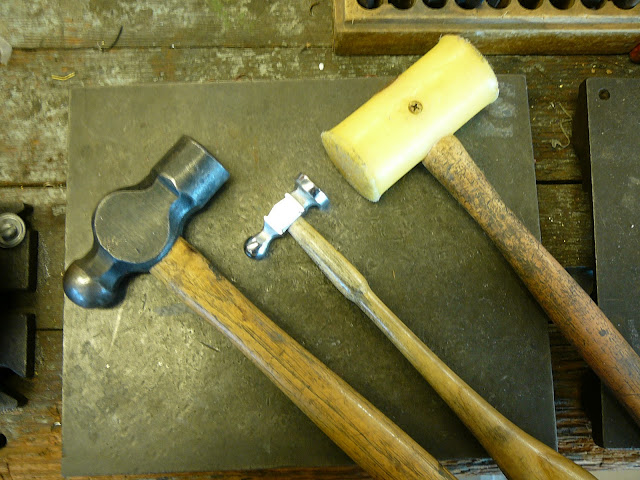
Heavy hammer for stamping, planishing hammer for texture, plastic mallet to flatten metal if it starts to curve, and a steel bench block.

You will notice in the pictures that I am experimenting using metal that has been cut into small squares and rectangles.  Typically copper, nickel and brass come in sheets that are 12 by 6 inches.  As you build up your home studio you may want to consider a table top shear to cut your metal with.  They are kinda pricey, the cheapest one from Rio is $400.
The link below is the one I have at home, and it is pretty good for copper, the other metals are harder and I don't think this thing is heavy duty enough to handle nickel and brass.  The shears from jewelry suppliers such as Rio and Otto Frei are much heavier duty, they are really great, but as I mentioned, they are an investment.


http://www.aes-group.com.au/product_info.php?products_id=208

You don't necessarily need to be cutting out these squares and rectangles, you can just texture directly onto the shapes you have cut with the jewelers saw.  Sometimes I like to do my texturing first and then cut out my shape and that is why having a shear is nice. If you don't want to spend a lot of dough at this point on a shear, you can use your jewelers saw to cut up your larger sheet of metal, or you can try a handheld shear, like a scissory shear.  I have not used one, but I have looked them up in the Rio catalog and there are a few.  You want one that will cut thicker metals so remember, 16 gauge is thicker than 20 gauge.

Patina:
All metals tarnish, it's kinda inevitable.  Copper tarnishes the most and a really pretty clean surface can become pretty yucky, dirty and dull over night.  Fear not, that is what we have Liver of Sulfur for!  L of S is a stinky yellow liquid that we submerge our metal into.  Yes it smells bad.  L of S comes in 3 different forms: liquid, gel, and rock.  The liquid form is the  most expensive, I don't use it.  I use the rock form and the gel form.  I would suggest the gel form. (page 465)

How to use liver of Sulfur:

Jax Black. (google search this product).


-For L of S gel or rocks, add a small amount to warm water in a plastic container.   It is a very small amount, when disintegrated the liquid should be very dark yellow.  If it is almost back it is way too strong so pour some out and add more water.
-Dip or drop your piece into the liquid.  Steel tweezers or rubber tipped tweezers are best for dipping and removing the work.
-Take your piece out BEFORE it turns black.  It should be a dark steely gray.  If you leave it in too long, it will chip off.
-Rinse, and use steel wool to rub off the surface of the patina.  The idea is that the patina will stay dark in the textured shapes, and lighter on the surface where it's been rubbed off.  Feel free to experiment with the amount you rub off.
-You can always drop it back in if you take off too much.
-Liver of Sulfur is kinda toxic.  You should probably wear latex gloves if you think you will be touching it.  It will in no way hurt your skin but I think over time it may be absorb into your skin. There are many pretty yucky chemicals in jewelry making, and I don't think this is one of the worst however, so don't let this scare you away from it.


Don't go any darker than this, it will start to chip off!
I used steel wool and soapy water to buff some of the patina off.


 Copper is beautiful when it's patinated.  And it really helps it to maintain the finish of the piece, rather than it getting tarnished over time.  It will also give lots of depth to your pieces.  Same goes for silver, but STERLIING SILVER only, fine silver will not patina because it's the copper content of sterling that is reacting to the patina.

Next week we will go over non textural finishing techniques, including sanding, and I will also discuss polishing in case you would like to make a bigger financial investment and get a polishing machine.

Until then!!

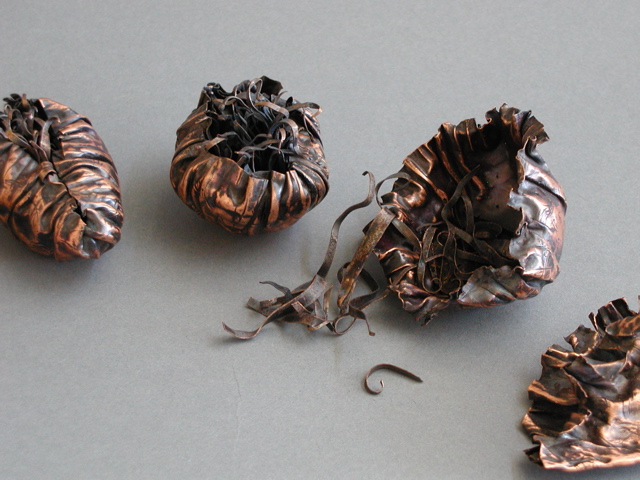
Student work. An incredible example of textured and Liver of Sulfured copper.