Tuesday, July 26, 2011

Ink Jet Transferring: Heaven 'n Hell

Ok, I finally have my new purchases up and running, and let me tell you it was not easy!!!!!!

So, I am doing a line of kid T shirts and lady undies that will be featuring my line of characters, My Imaginary Friends.  I thought I had found a great transfer paper so I bought tons of it and made a bunch of shirts.  I ran some wash tests, and I realized that if I wanted to sell this stuff, I really needed a higher quality transferring system.  I needed to find a way for the images to last through many washes.


My Imaginary Friend T, featuring Artsy-Fartsy

 Here is what I learned about printing and transferring at home:

-There is this printing technique called Sublimation Printing.  Basically it's a printer that prints directly onto your T shirts, mouse pads, totes, even onto mugs.  No transfer paper required.  It's relatively affordable, especially as a business investment.  The colors stay bright and last for as long as your T will.  Sounds great, right??  Well turns out sublimation printing is only for synthetics!!!!  NO COTTON!!!!!  Big bummer...

-There are these continuous ink systems in which you take a printer, alter it to fit this ink system and the inks live in bottles OUTSIDE of the printer.   I heard it was a bit of a hassle and can be messy.

-There are specialty inks that are made specifically for cottons.  They embed themselves into the cotton, rather than just sitting on top.  The images are durable and bright and long lasting.  These inks are used in continuous ink systems.  These inks are for inkjet printers.

-It is not recommended to take you're pre-existing printer and to add the continuous ink system and new inks to it.  To do this you have to clean your printer really well to make sure their is no residual ink inside it, and apparently it is a huge hassle.  Also, these inks are not for paper, only for transferring onto fabric.  

-Heat presses go hand in hand with any system of image transferring.  They range in price from $250 to $1500 and up for a commercial use press.

-Not all transfer paper is alike!  Everything sold in stores (Office depot, art supply, etc...) is NOT GOOD!!

So, I purchased all my stuff from a site called Best Blanks.  I bought their cheapest heat press, a low end Epson printer, the Workforce 30, a continuous ink system, and their inks called Armur Inks.  In addition,  I bought their transfer paper called Transferjet.


The heat press. I LUV IT!!!!!!

The printer and all the stuff I had to put together.  I was scared...

The printer and continuous ink system was basically a nightmare to install!  There were issues with the hoses that feed the ink to the printer and I had to call the company a few times to get some technical support.  It is a very delicate job to install this, there are circuit boards you need to not touch which they don't emphasize in the manual.

Filling the cartridge.

And, yes, there is potential for mess, especially if you're predisposed to mess...

I finally got the printer working and I was very happy with the results.  However a few days into successful printing, my printer stopped reading the inks.  Since the printer has been modified and a foreign cartridge has been installed, sometimes it gets prickly and can't find the ink source.  This was VERY frustrating and I had to call tech support a few times.  They walked me through a few things, and I am up and running again...


Panties are coming soon to my Etsy shop!


All in all I am very pleased with my purchases and all the cool things I can make using these items.  The inks, transfer paper and press are giving me great, durable images!

Tuesday, July 19, 2011

Not Your Mother's Craft Fair- Part 2

I am really excited about the first 2 Renegade Craft Fair artists I am featuring here today.  In a way their work is a world apart from each other, but to me I see lots of similarities.
Both are working with textiles, Carla Madrigal is doing intricate and almost tribal embroidery on re purposed neckties and fabric samples.  Alison Simonian is working with vinyl in bold, in your face color.  Both ladies are making jewelry and accessories, and they both create awesome cuff bracelets, which is a personal obsession of mine!  (One of many obsessions I should say...)

Carla Madrigal is from San Francisco, so she is practically my neighbor.  Her business is called Madrigal Embroidery.  The weird thing is, the day before the Renegade I was perusing Etsy and I found Carla's store and immediately favorited it.  Imagine my shock when I saw her and all her gorgeous wares the next day at the fair.

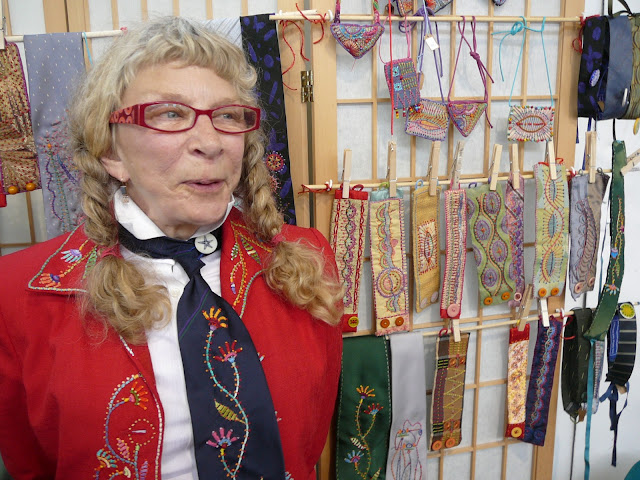
Carla in front of her cuffs.


This was Carla's first Renegade fair. She has been selling her accessories on Etsy since 2009.  She has been creating in lots of different materials and processes since she was a child, but embroidery has won her heart because of the potential for color and texture.

I swoon...Aren't the buttons simply the icing on the cake??
I asked Carla if she had any advice for craft show newbies...
"Patience, and remember it is a learning experience to figure out what the public will buy.
Items you make and give to delighted friends, co-workers, and relatives does not necessarily transfer to what the public will  purchase."


Thanks Carla for talking with me, I plan on buying a cuff soon!
www.madrigalembroidery.etsy.com

Last year was my first time going to the Renegade and I was pretty inspired by all the creativity and by the sheer volume and variety of purchasing possibilities.  When I saw Alison Simonian's booth, I didn't have to think twice about whether or not I was buying something but rather how many things I was going to buy!  (FYI, shopaholic here, but I consider it supporting my peers...)
And she had cuffs!!


 Alison has been in business under the moniker Miss Alison for ten years now.  Her business is vinyl accessories, all handmade by her.  She is an inspiration, for she is totally surviving off of her business.

I want candy...


 Alison studied apparel design in college, then began working for other designers, and eventually launched Miss Alison and hasn't had the time to look back.  She has been showing at the Renegade since it's very first show back in 2003.


I adore the bright, saturated vinyl colors and her use of contrast stitching designs.

 I was delighted to met up with Alison again this year at the fair, and suspect I will see here there again next year.  Until then I will be checking out her website, missalison.com

Thanks to Carla and Alison, and check back in next week for part 3 of my Renegade Craft Fair series!

Wednesday, July 13, 2011

Not Your Mother's Craft Fair- Part 1

It's that time of year when I gather up all the cash I can get my hands on and head to San Francisco for the the always inspiring Renegade Craft Fair!  This years fair will hit 6 cities;  Austin, Brooklyn, S.F, Los Angeles, Chicago and London.   I am so lucky to live right across the Bay from this fantastic event.
Even the posters and flyers are fun and original works of art.
This year I decided that I would love to get to know some of the artists exhibiting at the show and to pick their brains a bit about their experiences working the show.   I chose my 11 favorite artists (there were like 200!) and will be featuring them here, over the next few weeks.  The range is broad, from jewelery to plushy monsters.  If you want a sneak peek at their work, the artists I will be including are:
Carla Madrigal, madrigalembroidery.etsy.com
Alison Simonian, missalison.com
Gold Fools, http://hillarywebb.blogspot.com/  http://www.facebook.com/artmakesyousmart
Lisa Anderson Shaffer, zelmzrose.com
Sofia Masri, sofiamasri.com
Jen Hewett, jenhewett.blogspot.com/
Eling Chang Despres, migrationgoods.com
Joelle Medici, mrsogs.etsy.com
Jacob Deatherage, bookjournals.com
Ryan Hansen,magicindustrie.com
Faryn Davis, fernworks.org

I wish I could have bought something from all of these wonderful artists, but alas, I am a starving artist myself.  So, here are the goodies I did purchase...


Last year I bought  pink pair of porcelain earrings from Sofia Masri, and this year I knew I had to get a second pair, this time in purple.


 The colors, detail and texture in Carla Madrigals embroidered jewelry made me swoon.


As a person who uses sketchbooks a lot, I just couldn't resist these sketchbooks or journals made from vintage books, by experienced Renegadian Jacob Deatherage.


There was even an amazing and free photo booth that captured me and the girls in rare form!


Next week I will feature Carla Madrigal and Alison Simonian, so come back and check it out!
And, the fair will be in Los Angeles this weekend so if you're in the area, go!!!
You will never see so much creativity and innovation under one roof...

Friday, July 8, 2011

Illustrator Tutorial Part 2

Well, my new equipment is all set up, and I have had some minor set backs which I will get into later...
But for now here is the second part of the letters tutorial I promised you.
A disclaimer:  I am pretty new to Illustrator and I suspect there are tons of different ways to do what I am showing you.  I also may be making up names for things that a more proficient Illustrator user may scoff at, but, hey, aren't labels over rated anyways...
ok, here goes:


Ok all, come back again, next time I will discuss the nightmare of my new heat press!!!  You won't want to miss it!

Wednesday, July 6, 2011

Adobe Illustrator Letters Tutorial, part 1


Well my new equipment has finally arrived!   I can't wait to go set it up and to start cranking out some t shirts!  While waiting patiently for my package to arrive, I figured out how to take screen shots, and I prepared the following Illustrator tutorial.  Enjoy!

As an Adobe Illustrator newbie, the hardest part about the program has been drawing with the Pen Tool, Arc Tool, and anchor points.  Until like yesterday, I was pretty darn freaked out by anchor points. 
On my long list of things to do, was to make my own alphabet font.  This was a daunting task because of my fear of anchors, so I decided the best way for me to do it was thru the Live Trace function.  By the time I got to 'Z'  I realized I could do the whole thing without Live Trace, just using the Arc Tool and anchor points.  The the first part of this tutorial will show you how to get your original hand drawn letters into Illustrator with Live Trace, because I LOVE LIVE TRACE and think you will too!
Second part will be about how to manipulate the lines with the Direct Select tool, and how to draw the lines from scratch with the Arc Tool.
If you are new to Illustrator, then I hope this is clear and easy and that it helps you figure stuff out!


This is what my original letters looked like after scanning and opening the jpeg file up in Illustrator.  I used File-Place to get it into Illustrator.


This is what they look like after Live Trace and Expand.  There are different settings you can choose when tracing depending on what your original image is.  I used a simple trace,  but you can play around with different settings to see what looks best with your image.  Photos need to be traced at different settings then drawings, etc....
Once you have traced, you can retrace at a different setting.  You can keep trying different settings until you find one you like.  When you like it, hit EXPAND ( its to the right of the live trace button).  This gives your trace the anchor points it needs to be manipulated.


At this point all of the letters are not separate images, they are all in one group. 
Select the whole thing and do Object-ungroup.   
Re select on the background and hit delete.  This should just remove the background, that you can't see.
Now you can grab each letter, as well as delete the ugly stuff around them.


Now you're ready to go in and manipulate the letters.  Some of these letters I used pretty much as is, others looked pretty funky so I used them as a guide and re-drew over them, then deleted the original.  You don't have to have the original drawing to do this, most people who are familiar with Illustrator don't start with a trace, but it's a nice guide to have when learning about anchor points.


The thing about Live Tracing a line drawing is you end up with 2 outlines.  For the letters, I pulled out the inside outline shape, and discarded the outside outline.


Friday, July 1, 2011

In the meantime...my favorite new Illustrator trick!

Ok, Friday afternoon and I have not heard the gentle knock of the Fed Ex dude.  Sigh...

But, alas, I have decided to put some of my fine art up on my Etsy store....I know that with Etsy you have to be constantly adding new stuff and I have plenty of fine art to upload that should keep me busy until my gadgets get here.

So, Illustrator...IS ONLY THE MOST AMAZING PROGRAM EVER!

As a consummate craftsperson, I never thought that I would ever become hooked on computer generated art, but I truly am...
I have been using Illustrator for around 8 months now, and everyday I figure some new amazing trick.
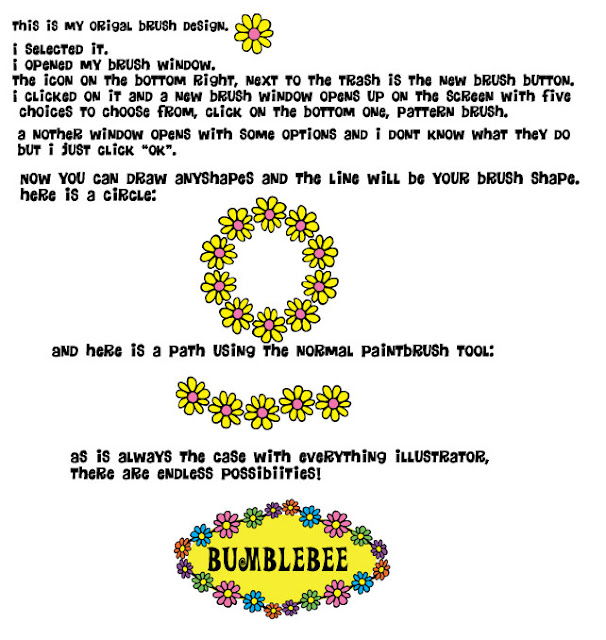
I dont yet know how to take screen shots, so this mini tutorial is going to be very...well, lets see if this worked:


It worked! Right? Cool, if you have not used the new brush tool, you will love it!!!!

I am going to go put more art in my Etsy shop now, bye!